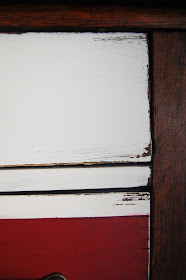
When I started restoring furniture, I never thought that hand painting detail work on the pieces would be something I would attempt.
I've never taken an art class, I have no special art skills, so I've been teaching myself as I go.
Here are some tips I've learned.
Brush choice
Like I said above, I've never had an art class, so I chose my brushes mostly based on price aka cheap. My favorites are the synthetic bristle brushes from Michael's. They sell different brush packages with various brushes and brush tips.
I like the synthetic because they are soft enough to be malleable, but stiff enough to give you clean lines. Plus they don't shed like hair bristle brushes.
This is my #1 brush of choice.
The angled edge created great lines and it's a great filler brush.
Free handing vs. Stencils
Stencils can get pricey and unless you're planning on using them multiple times, they may not be worth the investment. We've actually never bought a stencil; we make our own. I find that the biggest advantage to a stencil is that it helps with sizing your image to scale.
When I was painting the Princess Chest, I had a cut out of the princess. I made a few light pencil marks around the edge to help guide me, but then I removed the stencil and painted it free hand.
Free hand painting works best (in my experience) when you work one small area at a time. Don't try to outline the area; start from the outside edge and work in.
The Power of Tape
Taping lines is a great way to a little pizzaz to a piece.
There really is no secret method of taping lines.
I usually tape the horizontal lines all the way across and then lay the tape for the vertical lines over top.
When you remove the tape, you will have 8 small unpainted sections, 2 for each corner.
For these, instead of taping them off again, I use a straight edge, lie a piece of paper, and fill in one half the the space, move the straight edge to the other side, and fill in the other half.
One small tip to painting taped lines: Paint tends to build up along the edge of the tape. This can be avoided by tapping your paint brush along the surface or by dry brushing a slowing adding more layers of paint.
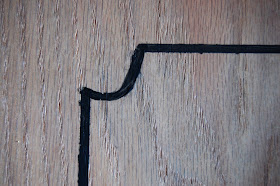
To add a curved corner to your lines as I did on the bowed buffet, simply do not overlay the horizontal and vertical tape line. When you decide the size of curve you want, tape off your horizontal line to the right length leaving room for the curve, and do the same with your vertical line.
Once the lines have been painted, remove the tape and add the curve. You can free hand it, or find a curved object, like a bowl, use that as your curved edge.
Technique
Really the best technique is whatever you feel comfortable with. If I'm free handing a curved line, like drop lines on the princess chest, I practice a few times on a piece of paper or a scrap of wood. As I said above, if you're using a stencil or taped lines, paint tends to build up along the edge of the tape/stencil. This can be avoided by tapping your paint brush along the surface or by dry brushing a slowing adding more layers of paint.
Always remember, it's easier to add more paint that it is to paint over a mistake, so take your time. :)
Less is more
You don't have to add detail to every inch of your piece. It can be really tempting to think, "Oh just one more stripe." or "A few more pokkadots would be sweet." With the princess chest I tried adding a boarder to the top. For me it was too much, but since everyone has different taste just remember if you're happy with it then you don't need to keep adding to it.
How true is that? Don't get discouraged if you paint a little outside the lines, or if it looks hand done, because guess what?! It IS!
And that's what makes it special! You've put a lot of time and raw developing talent into your work so be proud of it. :)


